Saturday, August 22, 2009

Sweet and Simple Newborn Hat

Materials:
1oz soft worsed weight yarn (I used Lion Brand Pound of Love)
G hook

Note: Many people have asked me what an adjustable loop is. It is a method used to eliminate the gap in the center of your work that is sometimes created when working in the round. It is also known as the magic ring. June Gilbank of Planet June has an excellent tutorial. http://www.planetjune.com/blog/magic-ring-for-amigurumi/ If you are not comfortable with the method, please feel free to replace adjustable loop with: ch 2, sc # specified in 2nd ch from hook for single crochet in the round OR ch 4, dc # specified in 4th ch from hook for double crochet in the round (the beginning ch 3 would count as your 1st dc).

Measurements: Rnds 1-4 measure 3.5" in diameter. From the top of the hat at rnd 1 to the bottom of the scallops on rnd 12, the hat measures 5 3/8".

Notes: Ch 3 counts as dc. Adjustable loop and first ch 3 can be substituted for ch 4, with dc's made in 4th ch from hook.

Make an adjustable loop.
Rnd 1: Ch 3, 11 dc in loop. Pull loop taut and join with sl st in top of beg ch 3. (12 dc)
Rnd 2: Ch 3, dc in same st, 2 dc in each remaining st around, join with sl st in top of beg ch 3. (24 dc)
Rnd 3: Ch 3, 2 dc in next st. (dc in next st, 2 dc in next st) X11, join with sl st in top of beg ch 3. (36 dc)
Rnd 4: Ch 3, dc in next st, 2 dc in next st. (dc in next 2 sts, 2 dc in next st) X11, join with sl st in top of beg ch 3. (48 dc)
Rnds 5-11: Ch 3, dc in each st across, join with sl st in top of beg ch 3. (48 dc each rnd)

Edging:
Rnd 12: (sk next 2 sts, 5 dc in next st, sk next 2 sts, sl st in next st) X8, end off and
weave in ends. (8 scallops)

Alternative to edging (simple, no scallops):
Rnd 12: Ch 3, dc in each st across, join with sl st in top of beg ch 3. (48 dc)
Rnd 13: Ch 1, sc in same st and each st around, end off and weave in ends. (48 sc)


Small Newborn/Large Preemie Size

Materials:
1oz soft worsed weight yarn (I used Lion Brand Pound of Love)
G hook

Measurements:

Notes: Ch 3 counts and dc. Adjustable loop and first ch 3 can be substituted for ch 4, with dc's made in 4th ch from hook.
Make an adjustable loop.
Rnd 1: Ch 3, 13 dc in loop. Pull loop taut and join with sl st in top of beg ch 3. (14 dc)
Rnd 2: Ch 3, dc in same st, 2 dc in each remaining st around, join with sl st in top of beg ch 3. (28 dc)
Rnd 3: Ch 3, 2 dc in next st. (dc in next st, 2 dc in next st) X13, join with sl st in top of beg ch 3. (42 dc)
Rnds 4-9: Ch 3, dc in each st around, join with sl st in top of beg ch 3. (42 dc each rnd)

Edging:
Rnd 10: (sk next 2 sts, 5 dc in next st, sk next 2 sts, sl st in next st) X7, end off and
weave in ends. (7 scallops)

Alternative to edging (simple, no scallops):
Rnd 10: Ch 3, dc in each st across, join with sl st in top of beg ch 3. (42 dc)
Rnd 11: Ch 1, sc in same st and each st around, end off and weave in ends. (42 sc)


Preemie Size

Materials:
1oz soft worsed weight yarn (I used Lion Brand Pound of Love)
G hook

Measurements:

Notes: Ch 3 counts and dc. Adjustable loop and first ch 3 can be substituted for ch 4, with dc's made in 4th ch from hook.
Make an adjustable loop.
Rnd 1: Ch 3, 11 dc in loop. Pull loop taut and join with sl st in top of beg ch 3. (12 dc)
Rnd 2: Ch 3, dc in same st, 2 dc in each remaining st around, join with sl st in top of beg ch 3. (24 dc)
Rnd 3: Ch 3, 2 dc in next st. (dc in next st, 2 dc in next st) X11, join with sl st in top of beg ch 3. (36 dc)
Rnds 4-8: Ch 3, dc in each st across, join with sl st in top of beg ch 3. (36 dc each rnd)

Edging:
Rnd 9: (sk next 2 sts, 5 dc in next st, sk next 2 sts, sl st in next st) X6, end off and
weave in ends. (6 scallops)

Alternative to edging (simple, no scallops):
Rnd 9: Ch 3, dc in each st across, join with sl st in top of beg ch 3. (36 dc)
Rnd 10: Ch 1, sc in same st and each st around, end off and weave in ends. (36 sc)

Friday, July 3, 2009

Baby Bottle Amigurumi

Materials:
f hook
small amounts of white, gold, and pink worsted weight yarn
tapestry needle
piece of plastic from the flat side of a milk jug or what you have available

Abbreviations:
blo-back loop only
flo-front loop only

Note: Many people have asked me what an adjustable loop is. It is a method used to eliminate the gap in the center of your work that is sometimes created when working in the round. It is also known as the magic ring. June Gilbank of Planet June has an excellent tutorial.http://www.planetjune.com/blog/magic-ring-for-amigurumi/ If you are not comfortable with the method, please feel free to replace adjustable loop with: ch 2, sc # specified in 2nd ch from hook for single crochet in the round OR ch 4, dc # specified in 4th ch from hook for double crochet in the round (the beginning ch 3 would count as your 1st dc).

Pattern Note: Mark stitches when working in round.

With white, make adjustable loop.
Rnd 1: 6 sc in loop, pull loop taut. (6sc)
Rnd 2: 2 sc in each st around. (12sc)
Rnd 3: (sc in next st, 2 sc in next st) repeat around. (18sc)
Rnd 4: (sc in next 2 sts, 2 sc in next st) repeat around. (24sc)
Rnd 5: sc blo around. (24sc)
Rnds 6-19: sc around, joining with sl st in next st at end of rnd 19 and ending off. (24sc each rnd)
Rnd 20: with pink (or color of choice) join with sl st in flo of next st, ch 3. dc in each remaining st in flo around. join with sl st in top of beg ch 3. (24dc)

***Cut plastic circle to fit in bottom of bottle and stuff most of the way.***

Rnd 21: ch 1, sc in same st and next st in blo, sc2tog over next 2 sts in blo. (sc in next 2 sts in blo, sc2tog over next 2 sts in blo) repeat to end of round. (18sc)
Rnd 22: (sc in next st, sc2tog over next 2 sts) repeat around, join with sl st in next st, end off, weave in ends. (12sc)


Teat:
With gold, make adjustable loop.
Rnd 1: 6 sc in loop, pull loop taut. (6sc)
Rnds 2-3: sc around. (6 each rnd)
Rnd 4: 2 sc in each st around. (12sc)
Rnd 5: (sc in next st, 2 sc in next st) repeat around. (18sc)
Rnd 6: sc around, join with sl st in next st, end off leaving long tail for sewing.

Assembly:
Using long tail left for sewing, sew through both loops of rnd 6 of teat and attach by sewing around each stitch between rnds 21 and 22 of the top of the bottle. Sew halfway, finish stuffing, then finish sewing.

Monday, May 25, 2009

Little Scallop Tote


Materials:

3oz worsted weight cotton yarn
h hook
tapestry needle

Note: Do not join unless otherwise stated, mark rows when needed. Bottom of tote has a diameter of 6"


Make adjustable loop, ch 1.
Rnd 1: 6 sc in loop, pull loop taut (6)
Rnd 2: 2 sc in each st around (12)
Rnd 3: (sc in next st, 2 sc in next st) around (18)
Rnd 4: (sc in next 2 sts, 2 sc in next st) around (24)
Rnd 5: (sc in next 3 sts, 2 sc in next st) around (30)
Rnd 6: (sc in next 4 sts, 2 sc in next st) around (36)
Rnd 7: (sc in next 5 sts, 2 sc in next st) around (42)
Rnd 8: (sc in next 6 sts, 2 sc in next st) around (48)
Rnd 9: (sc in next 7 sts, 2 sc in next st) around (54)
Rnd 10: (sc in next 8 sts, 2 sc in next st) around (60)
Rnd 11: (sc in next 9 sts, 2 sc in next st) around (66)
Rnd 12: (sc in next 10 sts, 2 sc in next st) around (72)
Rnd 13: (sc in next 11 sts, 2 sc in next st) around (78)
Rnd 14: sc around, join with sl st at end of rnd (78)
Rnd 15: ch 1, sc in same stitch. sk next 2 sts, 5 dc in next st, sk next 2 sts. (sc in next st, sk next 2 sts, 5 dc in next st, sk next 2 sts) repeat around. Join with sl st in first sc.
Rnd 16: ch 3, 4 dc in same st, sk next 2 sts, sc in next st, sk next 2 sts. (5 dc in next st, sk next 2 sts, sc in next st, sk next 2 sts) repeat around. Join with sl st in top of beg ch 3.
Rnd 17: sl st in next 2 sts. ch 1, sc in same sp, sk next 2 sts, 5 dc in next st, sk next 2 sts. (sc in next st, sk next 2 sts, 5 dc in next st, sk next 2 sts) repeat around. Join with sl st in first sc.
Rnds 18-22: repeat rnds 16 and 17, ending with a repeat of rnd 16
Rnd 23: ch 1, sc in same st and around (78)
Rnd 24: (sc in next 11sts, sc2tog over next 2 sts) around (72)
Rnd 25: sc in next st, ch 13, sk next 13 sts of rnd 24, sc in next 23 sts, ch 13, sk next 13 sts of rnd 24, sc to end of rnd
Rnd 26: sc around in each sc and ch (72)
Rnd 27: sc around, join with sl st at end of rnd, end off, weave in ends (72)

Saturday, May 9, 2009

Featured Blog!

For those of you who have a slightly darker sense of humor I have come across a great blog! The writer of 8 BIT WIT is a self proclaimed "rebel without applause," so let's give him some love. He offers free patterns on his blog as well as an affordable Stewie from Family Guy pattern in his Etsy shop. I am strongly considering buying his finished item, Brian from Family Guy!!

Wednesday, May 6, 2009

Sponge Guy Flat Pants


Materials:
small amounts of brown, yellow, white, red ww yarn
f hook
tapestry needle

Body (mark rows):
With brown, ch 10.
Rnd 1: sc in 2nd ch from hook and across. Working on other side of foundation ch, sc in next 9 sts. do not join. (18sts)
Rnd 2-3: sc around, sl st in next st at end of rnd 3, end off brown.
Rnd 4-5: Join with white, sc around, sl st in next st at end of rnd 5, end off white.
Rnd 6-13: Join with yellow, sc around, sl st in next st at end of rnd 13, end off yellow leaving long tail for sewing later.

Eyes (make 2):
With white, ch 2. 4 sc in 2nd ch from hook, join with sl st, end off leaving long tail
**Apply eyes between rnds 10-12. Make a french knot with black in center of each eye.**

Tie:
With red, ch5. sc in 2nd ch from hook, sl st in next 2 sts, sc in next st, end off leaving long tail.
**Attach top of tie between rnds 5 and 6, centering over one st and securing with a knot inside of body.**

Nose:
With yellow, ch 4, sl st in 2nd ch and across, end off.
**Attach nose between rnds 9 and 10, centering over one st and securing with a knot inside of body.**

Other Finishing Notes:
Sew teeth on row 7. Sew mouth on row 8. Sew on eyelashes with black as shown in picture. Sew top of body closed to lay flat (do not stuff) and attach keychain if desired.

Monday, April 6, 2009

Itsy Bitsy Baby


Materials:
small amounts of flesh, sleeper color, bib color, hair color
f hook
tapestry needle
embellishments (optional)

Note: Many people have asked me what an adjustable loop is. It is a method used to eliminate the gap in the center of your work that is sometimes created when working in the round. It is also known as the magic ring. June Gilbank of Planet June has an excellent tutorial. http://www.planetjune.com/blog/magic-ring-for-amigurumi/ If you are not comfortable with the method, please feel free to replace adjustable loop with: ch 2, sc # specified in 2nd ch from hook for single crochet in the round OR ch 4, dc # specified in 4th ch from hook for double crochet in the round (the beginning ch 3 would count as your 1st dc).

Ears (make 2)
With flesh, ch 2, sc in 2nd ch, end off.

Nose
With flesh, ch 2, sl st in 2nd ch, end off.

Head (working top to bottom)
With flesh, make adjustable loop.
Rnd 1: 6 sc in loop, pull loop taut (6)
Rnd 2: 2 sc in each st around (12)
Rnd 3: (sc in next st, 2 sc in next st) around (18)
Rnd 4-6: sc around (18 each rnd)
Attach nose and ears as pictured, by centering each tail around either side of a stitch and tying in a tight knot, weave in ends. Sew on eyes. Attach hair with a short piece of yarn, pulling it through a small part of sts on top of head and securing with a tight knot. Cut to length and fray.
Rnd 7: (sc in next st, sc2tog over next 2 sts) around (12)
Stuff.
Rnd 8: sc2tog around, join with sl st in next st, end off. Weave end through each st, pull taut and secure with knot to close. Weave in ends. (6)

Body
With sleeper color, make adjustable loop.
Rnd 1: 6 sc in loop, pull loop taut (6)
Rnd 2: 2 sc in each st around (12)
Rnd 3: (sc in next st, 2 sc in next st) around (18)
Rnd 4-5: sc around (18)
Rnd 6: (sc in next st, sc2tog over next 2 sts) around (12)
Rnd 7-8: sc around
Stuff.
Rnd 9: sc2tog around, join with sl st in next st, end off leaving long tail for sewing. (6)

Bib
With bib color, make adjustable loop allowing for long tail.
Row 1: 4 sc in loop, pull taut. (4)
Row 2: Ch 1, turn. 2 sc in each st across. End off, leaving long tail for one end of bib tie. Weave beg tail through to opposite corner for ties for bib. (8)

Legs (make 2)
With sleeper color, make adjustable loop.
Rnd 1: 5 sc in loop, pull loop taut.(5)
Rnd 2-4: sc around, join with sl st at end of rnd 4, ending off leaving a long tail for sewing. (5 each rnd)

Arms (make 2)
With flesh, make adjustable loop.
Rnd 1: 5 sc in loop, pull loop taut. Join with sl st in next st, end off. (5)
Rnd 2-4: Join with sleeper color with sc in any st at beg of rnd 2, sc around. Sl st in next st at end of rnd 4 and end off leaving long tail for sewing. (5 each rnd)

Assembly:
Attach body to bottom of head to hide ending decreases. Sew arms and legs on as shown in picture. Tie ends of bib snugly around neck and tie in knot or bow in back. Add other embellishments as desired.

***NOT INTENDED FOR CHILDREN UNDER 3. NEVER GLUE ON OR SEW ON SMALL EMBELLISHMENTS WHEN USING A DOLL AS A TOY FOR A SMALL CHILD.***


Saturday, April 4, 2009

Scallop Purse Pattern


Materials:
6oz worsted weight cotton yarn
h hook
tapestry needle
5" wooden purse handles (not needed for tote option)

Note: Adjustable loop may be replaced with ch 2. Sc would then be made in 2nd ch from hook.

Make adjustable loop.
Rnd 1: 6 sc in loop, pull loop taut (6)
Rnd 2: 2 sc in each st around (12)
Rnd 3: (sc in next st, 2 sc in next st) around (18)
Rnd 4: (sc in next 2 sts, 2 sc in next st) around (24)
Rnd 5: (sc in next 3 sts, 2 sc in next st) around (30)
Rnd 6: (sc in next 4 sts, 2 sc in next st) around (36)
Rnd 7: (sc in next 5 sts, 2 sc in next st) around (42)
Rnd 8: (sc in next 6 sts, 2 sc in next st) around (48)
Rnd 9: (sc in next 7 sts, 2 sc in next st) around (54)
Rnd 10: (sc in next 8 sts, 2 sc in next st) around (60)
Rnd 11: (sc in next 9 sts, 2 sc in next st) around (66)
Rnd 12: (sc in next 10 sts, 2 sc in next st) around (72)
Rnd 13: (sc in next 11 sts, 2 sc in next st) around (78)
Rnd 14: (sc in next 12 sts, 2 sc in next st) around (84)
Rnd 15: (sc in next 13 sts, 2 sc in next st) around (90)
Rnd 16: (sc in next 14 sts, 2 sc in next st) around (96)
Rnd 17: (sc in next 15 sts, 2 sc in next st) around (102)
Rnd 18: (sc in next 16 sts, 2 sc in next st) around (108)
Rnd 19-21: sc around, join with sl st in next st at end of rnd 21 (108 each rnd)
Rnd 22: ch 1, sc in same stitch. sk next 2 sts, 5 dc in next st, sk next 2 sts. (sc in next st, sk next 2 sts, 5 dc in next st, sk next 2 sts) repeat around. Join with sl st in first sc.
Rnd 23: ch 3, 4 dc in same st, sk next 2 sts, sc in next st, sk next 2 sts. (5 dc in next st, sk next 2 sts, sc in next st, sk next 2 sts) repeat around. Join with sl st in top of beg ch 3.
Rnd 24: sl st in next 2 sts. ch 1, sc in same sp, sk next 2 sts, 5 dc in next st, sk next 2 sts. (sc in next st, sk next 2 sts, 5 dc in next st, sk next 2 sts) repeat around. Join with sl st in first sc.
Rnds 25-29: repeat rnds 23 and 24, ending with a repeat of rnd 23
Rnd 30: (sc in next 16 sts, sc2tog over next 2 sts) around (102)
Rnd 31: sc around (102)
Rnd 32: (sc in next 15 sts, sc2tog over next 2 sts) around (96)
Rnd 33: sc around (96)
Rnd 34: repeat row 22
Rnd 35-37: repeat rows 23 and 24 ending with a repeat of rnd 23
Rnd 38-39: sc around (96 each rnd)

(***see below for tote option***)

First Handle Flap:
Row 40: ch 1, sc in the same st and in the next 20 sts
Row 41-44: ch 1, turn. sc across. End off at end of row 44.

Second Handle Flap:
Repeat rows 40-44 of handle flap for second handle flap, joining in the 28th st from first st of row 40 of first handle. Do not end off at end of row 44.

Finishing Border:
With right side facing out, ch 1 and sc around handle flaps and main part of purse, with 2 sc in the corner of each handle flap on row 44. End off, weave in all ends.

Finishing assembly:
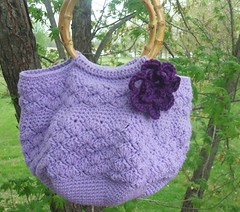
On each side, place purse handle in between handle flap and purse, with handle flap turned to the inside of purse as pictured. Sew top edge of handle flap to inside of rnd 38 of purse. Tie sewing yarn in tight knot to secure and weave in ends. Line and attach closures if desired.


Tote Option:

Rnd 40: sc around. Join with sl st in next st, end off, weave in ends.

Handles:
ch 4.
Row 1: sc in 2nd ch from hook and across.
Row 2-60: ch 1, sc across.
Finishing border: ch 1, sc around with 2 sc in each corner. End off weave in ends.

Assembly:
Place handles evenly on tote, with approximately 20 stitches in between each side of each handle. Sew into place on the inside of tote.


Wednesday, March 18, 2009

Arachnophobic Scarf


Materials:
7oz worsted weight yarn
I hook, J hook (for beginning chain)
ch 185.

Note: ch 4 counts as dc and ch 1. Sometimes when you skip dc's you will also be skipping the ch 1 sps. When skipping 3 chains and sc into next ch, you will be making your st closest to the sc from the previous row.

Row 1: Dc in fourth ch from hook (3 skipped chs count as first dc) and in each ch across.
Row 2: Ch 4 (counts as first dc plus ch 1, now and throughout), turn; skip next dc, dc in next dc, * ch 1, skip next dc, dc in next dc; repeat from * across.
Row 3: Ch 4, turn; dc in next dc, (ch 1, dc in next dc) 4 times, dc in next ch-1 sp and in next dc, * (ch 1, dc in next dc) 7 times, dc in next ch-1 sp and in next dc; repeat from * across to last 5 dc, (ch 1, dc in next dc) 5 times.
Row 4: Ch 4, turn; dc in next dc, (ch 1, dc in next dc) 3 times, dc in next ch-1 sp and in next dc, ch 5, skip next dc, dc in next dc, dc in next ch-1 sp and in next dc, * (ch 1, dc in next dc) 5 times, dc in next ch-1 sp and in next dc, ch 5, skip next dc, dc in next dc, dc in next ch-1 sp an in next dc; repeat from * across to last 4 dc, (ch 1, dc in next dc) 4 times.
Row 5: Ch 4, turn; dc in next dc, (ch 1, dc in next dc) twice, * dc in next ch-1 sp and in next dc, ch 4, sc in next ch-5 sp, ch 4, skip next 2 dc, dc in next dc, dc in next ch-1 sp and in next dc, (ch 1, dc in next dc) 3 times; repeat from * across.
Row 6: Ch 4, turn; dc in next dc, * ch 1, dc in next dc, dc in next ch-1 sp and in next dc, ch 4, skip next 2 dc and next 3 chs, sc in next ch, sc in next sc and in next ch, ch 4, skip next 2 dc, dc in next dc, dc in next ch-1 sp and in next dc; repeat from *across to last 2 dc, (ch 1, dc in next dc) twice.
Row 7: Ch 4, turn; dc in next dc, dc in next ch-1 sp and in next dc, * ch 4, skip next 2 dc and next 3 chs, sc in next ch, sc in next 3 sc and in next ch, ch 4, skip next 2 dc, dc in next dc, dc in next ch-1 sp and in next dc; repeat from *across to last dc, ch 1, dc in last dc.
Row 8: Ch 4, turn; dc in next dc, ch 1, * skip next dc, dc in next dc and in next 2 chs, ch 4 skip next sc, sc in next 3 sc, ch 4, skip next sc and next 2 chs, dc in next 2 chs and in next dc, ch 1; repeat from * across to last 3 dc, skip next dc, dc in next dc, ch 1, dc in last dc.
Row 9: Ch 4, turn; (dc in next dc, ch 1) twice, * skip next dc, dc in next dc and in next 2 chs, ch 4, skip next sc, sc in next sc, ch 4, skip next sc and next 2 chs, dc in next 2 chs and in next dc, ch 1, skip next dc, (dc in next dc, ch 1) twice; repeat from *across to last dc, dc in last dc.
Row 10: Ch 4, turn; (dc in next dc, ch 1) 3 times, skip next dc, dc in next dc and in next 2 chs, ch 1, skip next sc and next 2 chs, dc in next 2 chs and in next dc, ch 1, * skip next dc, (dc in next dc, ch 1) 4 times, skip next dc, dc in next dc and in next 2 chs, ch 1, skip next sc and next 2 chs, dc in next 2 chs and in next dc, ch 1; repeat from * across to last 5 dc, skip next dc, dc in next dc, (ch 1, dc in next dc) 3 times.
Row 11: Ch 4, turn; (dc in next dc, ch 1) 4 times, skip next dc, dc in next dc, dc in next ch-1 sp and in next dc, ch 1, * skip next dc, (dc in next dc, ch 1) 6 times, skip next dc, dc in next dc, dc in next ch-1 sp and in next dc, ch 1; repeat from * across to last 6 dc, skip next dc, dc in next dc, (ch 1, dc in next dc) 4 times.
Row 12: Ch 4, turn; (dc in next dc, ch 1) 5 times, * skip next dc, (dc in next dc, ch 1) 8 times; repeat from * across to last 7 dc, skip next dc, dc in next dc, (ch 1, dc in next dc) 5 times.
Row 13: Ch 3 (counts as first dc), turn; dc in next ch-1 sp and in each dc and each ch-1 sp across.

EDGING

picot cluster- ch 3, sl st in 3rd ch from hook. ch 4, sl st in 4th ch from hook, ch 3, sl st in 3rd ch from hook.

First Edge:
Row 1: continuing from row 13, 2 sc at the end of each row across, join with sl st in beg ch.
Row 2: ch 3, turn, (sk next 2 sts, sl st in next st, ch 3) 7 times. sk next st, sl st in next st.
Row 3: do not ch, turn. (2sc in next ch 3 sp, picot cluster, 2 sc in same ch 3 sp) across. join with sl st in next st of foundation ch. End off, weave in all ends.

Second Edge:
Repeat first edge on opposite side of scarf with right side up, beginning with a sl st in bottom of beg ch 3 and replacing "foundation ch" with "dc" in row 3.

Saturday, March 7, 2009

Little Bird's Holiday Amigurumi


Materials:
f hook
small amounts of- pink, yellow, green, blue, purple, lt. blue, and brown.
black thread (size 10 cotton recommended-for eyes) OR 9mm black ami eyes
tapestry needle
fiberfill

Note: When working in the round do not join unless otherwise stated. Mark stitches at the end of each row.

Basket:
With brown, make adjustable loop. Ch1.
Rnd 1: 6 sc in loop, pull loop taut. (6sc)
Rnd 2: 2 sc in each st around. (12sc)
Rnd 3: (sc in next st, 2 sc in next st) repeat around. (18sc)
Rnd 4: (sc in next 2 sts, 2 sc in next st) repeat around. (24sc)
Rnd 5-8: sc around. (24sc)
Rnd 9: (sc2tog, sc in next 10 sts) twice. Join with sl st in next st. Ch 25, join with sl st in 11th st from last sc being careful not to twist ch. End off, weave in ends.

Balloon:
With pink, make adjustable loop. Ch1.
Rnd 1: 6 sc in loop, pull loop taut. (6sc)
Rnd 2: 2 sc in each st around. (12sc)
Rnd 3: (sc in next st, 2 sc in next st) repeat around. (18sc)
Rnd 4: (sc in next 2 sts, 2 sc in next st) repeat around. (24sc)
Rnd 5: sc around. Join with sl st in next st, end off. (24sc)
Rnd 6: Join with sc in next st with yellow. sc in next 2 sts, 2 sc in next st. (sc in next 3 sts, 2 sc in next st) around. (30sc)
Rnd 7-9: sc around. Join with sl st in next st at end of rnd 9, end off. (30sc each rnd)
Rnd 10: Join with sc in previous st with green. sc around. (30sc)
Rnd 11-13: sc around. Join with sl st in next st at end of rnd 13, end off. (30sc each rnd)
Rnd 14: Join with sc in next st with blue. sc around. (30sc)
Rnd 15-16: sc around. (30sc each rnd)
Rnd 17: (sc in next 3 sts, sc2tog over next 2 sts) around. Join with sl st in next st, end off. (24sts)
**Stuff**
Rnd 18: Join with sc in previous st with purple, sc in next st. (sc2tog over next 2 sts, sc in next 2 sts) x5. sc2tog over next 2 sts. (18sts)d
Rnd 19: (sc in next st, sc2tog over next 2 sts) around. (12sc)
Rnd 20-21: sc around. Join with sl st in next st at end of rnd 21, end off, weave in ends. (12sc each rnd)

Bottom of balloon:
With purple, make adjustable loop. Ch1.
Rnd 1: 6 sc in loop, pull loop taut. (6sc)
Rnd 2: 2 sc in each st around. Join with sl st in next st, end off leaving long end for sewing. (12sc)

Bird beak:
With yellow, ch 2, sc in 2nd ch from hook, end off. **Once row 6 of bird is reached you will attach beak by centering over a st between rnds 5 and 6 of bird. Pull ends, one on either side of st, through to back and tie in a knot to secure. Add eyes at this time.**

Bird (working from top to bottom):
With lt. blue, make adjustable loop. Ch1.
Rnd 1: 6 sc in loop, pull loop taut. (6sc)
Rnd 2: 2 sc in each st around. (12sc)
Rnd 3: (sc in next st, 2 sc in next st) repeat around. (18sc)
Rnd 4-8: sc around. (18sc)
**Stuff**
Rnd 9: (sc in next st, sc2tog over next 2 sts) around. (12sc)
Rnd 10: sc2tog around. End off, leaving long tail. Weave tail through each st and pull taut. Secure with knot, weave in end.

Assembly: When assembling, be sure to keep color changes (ending and beginning rows) to the back. Begin sewing bottom of balloon to balloon opening with right side out. With one st secured, center ch from basket over bottom of ballon, so that it will hang as pictured. Sew next st, making sure to sew around ch, but not through it so that adjustments can be made later if necessary. Sew halfway to other side and secure other side of ch between sts as with the first side. When sewing is complete, secure with knot and weave in ends. Place bird in basket centering bird face to the front. Whipstitch or glue bird into place if necessary or desired. Cut a 7" piece of pink yarn and pull through each side of rnd 1 of balloon so that balloon will hang centered. Secure with a knot at end making a loop and pull knot around, tucking it into the inside of balloon.


Wednesday, February 18, 2009

Going Postal Scarf


Materials:
7oz worsted weight yarn
I hook, J hook (for beginning chain)

Abbreviations:
hdc- half double crochet
FLO- front loop only
BLO- back loop only
fpdc- front post double crochet
bpdc- back post double crochet

Notes: Ch 2 counts as first hdc, so you will skip first hdc at beginning of row. Ch 3 counts as dc. ch 4 counts as dc and ch 1. Each ch 1 sp counts as a st.

Ch 176 with J hook.
Row 1: With I hook, hdc in 2nd ch from hook and across. Ch 2, turn.
Row 2: hdc in FLO across. (175hdc)
Row 3: hdc in BLO across. Ch 3, turn. (175hdc)
Row 4: (fpdc around next st, dc in next st) across. Ch 3, turn. (88dc, 87fpdc)
Row 5: (dc in next st, bpdc in next st) across until reaching last 2 sts. dc in last 2 sts. Ch 2, turn. (89, 86bpdc)
Row 6: hdc across. ch 4, turn.(175 hdc)
Row 7: (skip next st, dc in next st, ch 1) across. (88dc, 87 ch1 spaces)
Rows 8-9: ch 2, turn. hdc in each st across. Ch 3, turn at end of row 9. (175hdc)
Row 10: (fpdc around next st, dc in next st) across. Ch 3, turn. (88dc, 87fpdc)
Row 11: (dc in next st, bpdc in next st) across until reaching last 2 sts. dc in last 2 sts. Ch 2, turn. (89, 86bpdc)
Row 12: hdc in FLO across. Ch 2, turn. (175hdc)
Row 13: hdc in BLO across. End off, weave in ends.

Wednesday, January 21, 2009

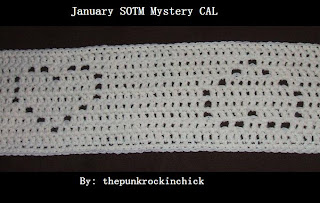
"There's A Hole In My Heart" Scarf


Mystery CAL Name: Seeing Between The Lines

Materials:
I hook, J hook
6oz worsted weight yarn in solid color

With J hook, ch 207.
Row 1: With I hook, dc in 4th ch from hook and across. ch 3, turn.
Row 2: dc in next 10 dc. *ch 1, sk next st, dc in next 21 sts. ch 1, sk next st, dc in next st. ch 1, sk next st, dc in next 3 sts. ch 1, sk next st, dc in next st. ch 1, sk next st,** dc in next 21 sts.*** Repeat * to *** twice. Repeat * to ** once. dc in last 7 sts. Ch 3, turn
Row 3: dc in next 4 sts. *ch1, sk next st, dc in next 5 sts. ch 1, sk next st, dc in next 5 sts. ch 1, sk next st, dc in next 17 sts. ch 1, sk next st, dc in next 3 sts. ch 1, sk next st,** dc in next 17 sts.*** Repeat * to *** twice. Repeat * to ** once. dc in last 9 sts. Ch 3, turn.
Row 4: dc in next 6 sts. *ch 1, sk next st, dc in next 7 sts. ch 1, sk next st, dc in next 15 sts. ch 1, sk next st, dc in next 11 sts. ch 1, sk next st,** dc in next 15 sts.*** Repeat * to *** twice. Repeat * to ** once. dc in last 5 sts. ch 3, turn.
Row 5: dc in next 4 sts. *ch 1, sk next st, dc in next 11 sts. ch 1, sk next st, dc in next 13 sts. ch 1, sk next st, dc in next 11 sts. ch 1, sk next st,** dc in next 13 sts.*** Repeat * to *** twice. Repeat * to ** once. dc in last 5 sts. Ch 3, turn.
Row 6: dc in next 4 sts. *ch 1, sk next st, dc in next 11 sts. ch 1, sk next st, dc in next 15 sts. ch 1, sk next st, dc in next 7 sts. ch 1, sk next st,** dc in next 15 sts.*** Repeat * to *** twice. Repeat * to ** once. dc in last 7 sts. Ch 3, turn.
Row 7: dc in next 8 sts. *ch 1, sk next st, dc in next 3 sts. ch 1, sk next st, dc in next 17 sts. ch 1, sk next st, dc in next 5 sts. ch 1, sk next st, dc in next 5 sts. ch 1, sk next st** dc in next 17 sts.*** Repeat * to *** twice. Repeat * to ** once. dc in last 5 sts. ch 3, turn.
Row 8: dc in next 6 sts. *ch 1, sk next st, dc in next st. ch 1, sk next st, dc in next 3 sts. ch 1, sk next st, dc in next st. ch 1, sk next st, dc in next 21 sts. ch 1, sk next st,** dc in next 21 sts.*** Repeat * to *** twice. Repeat * to ** once. dc in last 11 sts. Ch 3, turn.
Row 9: dc in each st across.

BORDER: sc around, with 2 sc in each corner and 2 sc at the end of each row of short sides.

Picture Courtesy of Karen Parks

Wednesday, January 7, 2009

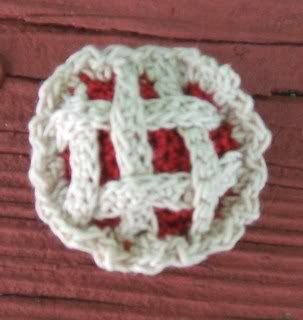
Miniature Pie

Photobucket

Miniature Pie
#10 thread: red, tan, silver
size 1 steel hook
very small amount stuffing
sewing needle

Measures: 1 3/8" across when finished.

Pie tin:
With silver ch 4.
Rnd 1: 12 dc in 4th ch from hook. Join with sl st in 1st dc. Ch3, do not turn. (12dc)
Rnd 2: 2dc in each st around. Join with sl st in 1st dc. Ch1, do not turn. (24dc)
Rnd 3: sc around. Join with sl st in 1st sc. End off, weave in ends. (24sc)

Pie filling (Use stitch markers to keep track of rows):
Make an adjustable loop with red and ch1.
Rnd 1: 6sc into loop. Pull end taut and do not join. (6sc)
Rnd 2: 2sc in each st around (12sc)
Rnd 3: (sc in next st, 2 sc in next st) x6 (18sc)
Rnd 4: (sc in next 2 sts, 2 sc in next st) x6 (24sc)
Rnd 5: (sc in next 3 sts, 2 sc in next st) x6 (30sc)
Rnd 6: (sc in next 4 sts, 2 sc in next st) x6 Join with sl st in next st. End off, weave in ends. (36sc)

Crust:
Long lattice (Make 4)- With tan ch 10. sc in 2nd ch from hook and each across. End off. (9sc)
Short lattice (Make 1)- With tan ch 8. sc in 2nd ch from hook and each across. End off. (7sc)
**Attach lattice as show in picture (interweaving pieces). Secure first end of each lattice by pulling ends through the edge of 2 sts and tying a knot in the back. Secure other ends while working around pie filling by inserting hook through end off lattice and stitches being worked. "Short lattice" is shown in the first picture as the top horizontal piece.**
Crust edge- With tan join with sl st into any st. Ch 3. dc in same st, sc in next st. (2 dc in next st, sc in next st) x17. Join with sl st in top of ch 3. End off, weave in ends.
**Secure lattice in place with glue or by placing one st with tan thread and needle where 2 pieces meet**

Assembly: Sew pie top and pie tin with wrong sides together, placing stitches on the wrong side of pie top between rnd 6 of pie filling and crust and wrong side of pie tin between rows 2 and 3. Before sewing completely around, place small amount of stuffing inside. Finish sewing completely around and tie thread in knot, pulling slightly taut. Weave in ends.

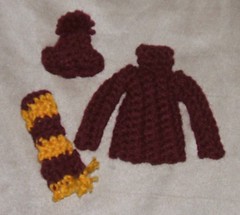
Scarf, Hat, & Sweater Ornaments

Hat, Scarf, & Sweater Ornaments

Scarf Ornament
With color a, Ch 4.
Row 1: sc in 2nd ch from hook and across. Ch 1, turn.
Row 2: sc across. Ch 1, turn.
Rows 3-26: Repeat Row 2, changing colors every 3rd row between color a and color b if desired.
Row 27: sc across. End off, weave in ends.

Finishing touches: Add fringe- With 6 short pieces of color b, attach once piece to each st on both short sides of scarf. Use a tapestry needle to fray yarn. Fold scarf and sew or glue scarf as shown in picture. Attach a 7" piece of yarn or thread to top of scarf for hanger and tie in knot.


Hat Ornament
With color a, ch 8.
Row 1: sc in 2nd ch from hook and across. Ch 1, turn.
Rows 2-7 sc in blo across. Ch 1, turn.
Row 8: sc in blo across. End off, leaving long tail for sewing.

Finishing touches: Sew first row and last row (short sides) together to form a tube. Then, weave yarn through one each row one of the long sides and pull taut to form hat. Make a small pom-pom and attach to top of hat where gathered. Secure on the inside of hat and weave in ends.


Sweater

Body:
With color a, ch 26.
Row 1: sc in 2nd ch from hook and across. Ch 1, turn.
Rows 2-6: sc in blo across. Ch 1, turn.
Row 7: sc in blo across. End off, weave in ends.

Sleeves (Make 2):
With color a, ch 11,
Row 1: sc in 2nd ch from hook and across. Ch 1 turn.
Rows 2-4: sc in blo across. Ch1, turn.
Row 5: sc in blo across. End off, leaving ample yarn for sewing.

Collar:
With color a, ch 10.
Row 1: sc in 2nd ch from hook and across. Ch 1, turn.
Row 2: sc in blo across. End off, leaving ample yarn for sewing.

Sweater finishing touches: Choose right and wrong sides for body and fold in half with right sides together. On each long side, sew together through both layers through 10 sts. There should be 5 stitches remaing for arm holes on each side. Flip sweater body right side out. Sew long sides of sleeves together to form 2 long tubes. Sew the short side of each sleeve (where you left off from sewing up the side) to the arm holes of each side of the body. Secure with knot and weave in ends on inside. Sew short sides of collar together to form a tube and sew to top center of sweater as shown in picture, keeping the collar rounded.

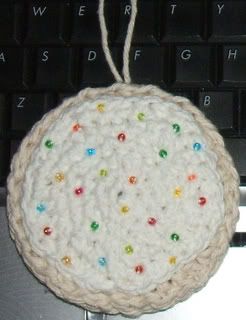
Sugar Cookie Ornament

Photobucket

Sugar Cookie Ornament

Contents:
1 skein of cream cotton yarn
1 skein white cotton yarn
Beads for sprinkles
F hook

Cookie (Make 2):
With cream, ch 4.
Rnd 1: 12 dc in 4th ch from hook. Join with sl st in first dc. Ch 3, do not turn.
Rnd 2: 2dc in each st around. Join with sl st in first dc. Ch 3, do not turn.
Rnd 3: (dc in next st, 2dc in next st) x 12. Join with sl st in first dc. Ch 3, do not turn.
Rnd 4: (dc in next 2 sts, 2dc in next st) x 12. Join with sl st in first dc. End off, weave in ends.

Icing (Do not join unless otherwise stated. Use stitch marker to keep track of rows):
With white, ch 2.
Rnd 1. 6sc in 2nd ch from hook.
Rnd 2. 2 sc in each of the next 6 sts.
Rnd 3: (sc in next st, 2 in next stitch) x6.
Rnd 4. (sc in next 2 sts, 2 in next stitch) x6.
Rnd 5. (sc in next 3 sts, 2 in next stitch) x6.
Rnd 6. (sc in next 4 sts, 2 in next stitch) x6.
Rnd 7: ***sc in next st, hdc in next st, dc in next st, sc in next st, hdc in next st. (dc, sc) in next st. hdc in next st, dc in next st, sc in next st, hdc in next st, dc in next st. (sc, hdc) in next st. dc in next st, sc in next st, hdc in next st, dc in next st, sc in next st. (hdc, dc) in next st.** Repeat from *** to ** once more. Join with sl st in next st. End off, leaving ample yarn for sewing.

ASSEMBLY: Sew or glue beads on icing as shown in picture. Sewing around inner edge of icing, weaving in and out, attach icing to first cream circle with right sides up as shown in picture. Secure sewing yarn on back with a knot and weave in ends. Sew two cookie pieces with wrong sides together, weaving in and out through both layers of outer edge of circles. Secure with knot, weave in ends. Cut 6 or 7" piece of cream yarn attach to top of cookie, making a loop for hanging.

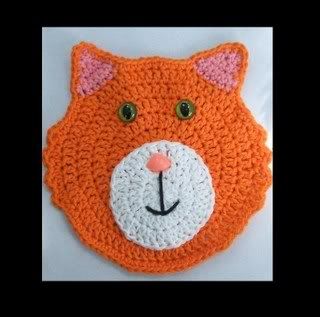
Fat Tabby Potholder/Hotpad

Photobucket

Fat Tabby Potholder/Hotpad
**Decorative use only. Eyes and nose will melt when exposed to heat! For a functional potholder, only use natural fibers.**

Materials:
2oz in main color (mc), worsted weight cotton yarn
small amount white worsted weight cotton yarn
2- 18mm cat eyes
1- 15mm pink animal nose
H hook

Front
Face: With mc, ch4.
Rnd 1: 12 dc in 4th ch from hook. Join with sl st in first dc. Ch 3, do not turn.
Rnd 2: 2dc in each st around. Join with sl st in first dc. Ch 3, do not turn.
Rnd 3: (dc in next st, 2dc in next st) x 12. Join with sl st in first dc. Ch 3, do not turn.
Rnd 4: (dc in next 2 sts, 2dc in next st) x 12. Join with sl st in first dc. Ch 3, do not turn.
Rnd 5: (dc in next 3 sts, 2dc in next st) x 12. Join with sl st in first dc. Ch 3, do not turn.
Rnd 6: (dc in next 4 sts, 2dc in next st) x 12. Join with sl st in first dc. End off.

Ear 1:
Rnd 7: With pink, join with sc in any st of rnd 6 of face. sc in next 5 sts. Ch 1, turn.
Rnd 8: sc across. Ch 1, turn.
Rnd 9: sc2tog, sc in next 2 sts, sc2tog. Ch1, turn.
Rnd 10: sc across. Ch 1, turn.
Rnd 11: sc2tog, twice. Ch 1, turn.
Rnd 12: sc across. Ch 1, turn.
Rnd 13: sc2tog. End off, weave in ends.

Ear 2:
Rnd 7: With pink, join with sc in 9th st from end of row 7 of first ear. sc in next 5 sts. Ch 1, turn.
Rnd 8: sc across. Ch 1, turn.
Rnd 9: sc2tog, sc in next 2 sts, sc2tog. Ch1, turn.
Rnd 10: sc across. Ch 1, turn.
Rnd 11: sc2tog, twice. Ch 1, turn.
Rnd 12: sc across. Ch 1, turn.
Rnd 13: sc2tog. End off, weave in ends.

Muzzle:
With white, ch4,
Rnd 1: 12 dc in 4th ch from hook. Join with sl st in first dc. Ch 3, do not turn.
Rnd 2: 2dc in each st around. Join with sl st in first dc. Ch 3, do not turn.
Rnd 3: (dc in next st, 2dc in next st) x 12. Join with sl st in first dc. End off, leaving 18"+ for sewing. Weave in first end.

****Assemble Face: Apply safety 18mm cat eyes to Rnd 4 of face as shown in picture. Secure eyes with metal washers on back of face. Push nose through bottom of rnd 3 just above rnd 2 of muzzle and through center of rnd 1 of face. Secure nose with plastic washer on back of face. Sew muzzle to face by weaving in and out of edge of sts of rnd 3. Secure with knot, weave in ends. Sew on mouth as shown in picture. Sew on whiskers if desired.****

Back
Back of head: With mc, ch4.
Rnd 1: 12 dc in 4th ch from hook. Join with sl st in first dc. Ch 3, do not turn.
Rnd 2: 2dc in each st around. Join with sl st in first dc. Ch 3, do not turn.
Rnd 3: (dc in next st, 2dc in next st) x 12. Join with sl st in first dc. Ch 3, do not turn.
Rnd 4: (dc in next 2 sts, 2dc in next st) x 12. Join with sl st in first dc. Ch 3, do not turn.
Rnd 5: (dc in next 3 sts, 2dc in next st) x 12. Join with sl st in first dc. Ch 3, do not turn.
Rnd 6: (dc in next 4 sts, 2dc in next st) x 12. Join with sl st in first dc. Do not end off.

Ear 1:
Rnd 7: Continuing from rnd 6 of back, ch 1, sc in same st and in next 5 sts. Ch 1, turn.
Rnd 8: sc across. Ch 1, turn.
Rnd 9: sc2tog, sc in next 2 sts, sc2tog. Ch1, turn.
Rnd 10: sc across. Ch 1, turn.
Rnd 11: sc2tog, twice. Ch 1, turn.
Rnd 12: sc across. Ch 1, turn.
Rnd 13: sc2tog. End off, weave in ends.

Ear 2:
Rnd 7: Join with sc in 9th st from end of row 7 of first ear. sc in next 5 sts. Ch 1, turn.
Rnd 8: sc across. Ch 1, turn.
Rnd 9: sc2tog, sc in next 2 sts, sc2tog. Ch1, turn.
Rnd 10: sc across. Ch 1, turn.
Rnd 11: sc2tog, twice. Ch 1, turn.
Rnd 12: sc across. Ch 1, turn.
Rnd 13: sc2tog. End off, weave in ends.

Outer Edge/Joining:
**Work through front and back of face with wrong sides together (front of face facing up), matching up coordinating stitches.**
Rnd 7: Join with sl st in corner of first ear. Ch1, sc in same st. sc around ear with sc at end of each row and 3 in top corner. sc in other corner of ear where rnd 7 of ear meets rnd 6 of face. sc in next 3 sts, 2sc in next st, sc in next 4 sts. sc in corner of ear where rnd 7 of ear meets rnd 6 of face. sc around ear with sc at end of each row and 3 in top corner. sc in other corner of ear where rnd 7 of ear meets rnd 6 of face. sc in next 5 sts. **(dc, ch1, dc) in next st, sc in next st.* Repeat from ** to * 3 more times. (sc in next 5 sts, 2 sc in next st) x 4. sc in next 3 sts. Repeat ** to * 4 times. sc in next 4 sts. sl st in beg st, end off, weave in ends.

****Glue or sew picture hanger to back if desired.****

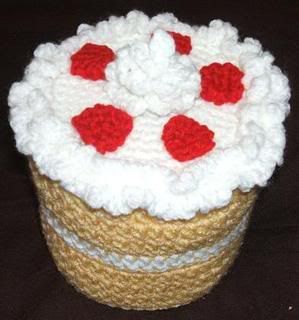
Strawberry Shortcake TP Cover (Revised)

This pattern has been revised, please let me know if there are any problems. My email is at the top of this page. :)

Photobucket

Strawberry Shortcake TP Cover

Materials:
small amount red worsted weight yarn
small amount white worsted weight yarn
small amount cormeal/yellow worsted weight yarn
G hook
tapestry needle

FLO=front loop only
BLO=back loop only
HDC=half double crochet

**Do not join unless otherwise instructed. Mark stitches when working in the round.**

Strawberries (worked in round-spiral, make 5):
With red, ch 2.
Rnd 1: 4 sc in 2nd ch from hook (4 sc)
Rnd 2: 2 sc in each st around (8 sc)
Rnd 3: sc around (8 sc)
Rnd 4: sc around, join with sl st in next st, end off leaving long tail (8 sc)
**Using tail, sew shut top of strawberry so that it lays flat. Weave in ends.**

Whipped cream:
With white, ch 65. sl st in 4th ch from hook. (ch 3, sl st in next st) across. End off, leaving long tail.
** Arrange in a spiral shape to resemble whipped cream as pictured. Sew across bottom to hold shape. Weave in ends.**

Cake Top/Icing:
With white, ch 3.
Rnd 1: 8 hdc in 3rd ch from hook, join with sl st in top of beg ch 2 (9 hdc).
Rnd 2: Ch 2, hdc in same st, 2 hdc in each remaining st, join with sl st in top of beg ch 2 (18 hdc).
Rnd 3: Ch 2, 2 hdc in next st, (hdc in next st, 2 hdc in next st) repeat around, join with sl st in top of beg ch 2 (27 hdc).
Rnd 4: Ch 2, hdc in next st, 2 hdc in next st, (hdc in next 2 sts, 2 hdc in next st) repeat around, join with sl st in top of beg ch 2 (36 hdc).
Rnd 5: Ch 2, hdc in next 2 sts, 2 hdc in next st, (hdc in next 3 sts, 2 hdc in next st) repeat around, join with sl st in top of beg ch 2 (45 hdc).
Rnd 6: Ch 2, hdc in next 3 sts, 2 hdc in next st, (hdc in next 4 sts, 2 hdc in next st) repeat around, join with sl st in top of beg ch 2 (54 hdc).
Rnd 7: (ch 3, sl st in FLO of same st. ch 3, sl st in FLO of next st) around. End off, weave in ends.

Cake Bottom:
With Cornmeal, join with sl st in any back loop of rnd 7.
Row 1-4: Ch 3, dc around. Join with sl st at top of beg ch 3, end off at end of rnd 4 (54 dc)
Row 5: with white, join in next st, ch 3, dc around. Join with sl st at top of beg ch 3, end off (54 dc)
Row 6-8: Join with cornmeal with sl st in next st, ch3, dc around. Join with sl st in top of beg ch 3, ch 1 (54 dc)
Row 9: sc in same st and around, join with sl st in 1st sc, end off (54 sc)

**Assembly: Arrange whipped cream and strawberries on cake top and glue or sew to attach as shown in picture.**

First Post

Well, it's about time I started a blog! But it's taken me a few hours to write this as it is, having my son interrupt me every five seconds (he loves to "help" me type). Just breaking the ice. Look out for patterns and "bitchings" by me coming soon...